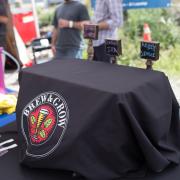
After countless trips to Home Depot, after reading more than a dozen web-sites, after being too electronically challenged to understand what Bill and David tried to explain to me months ago, and after harassing Bill and David with electrical questions, my baby is finished and cooling away after three months in the making. I have to admit, I'm pretty proud of myself; have never done any kind of electrical work like this before.
Find photos below.


Did you just get plain old vanilla cedar or was it treated in any way? Did you treat it, stain it, seal it? My chest freezer is pretty small but I think I can squeeze 4 ball locks and the co2 in there.
Any reason you went with 2x6 instead of 1x6? I ask because I want to make this thing as light as possible and 1x6 with some insulation would be nice and light.
Jake, I am putting together my keezer now and was wondering about your choice of cedar instead of pine or oak. I was thinking of using cedar because I love the look and smell but was curious if there are any drawbacks/cons with using it.
Thomas,
Here's a list of all the things I bought:
(1) A 15-amp wall outlet;
(2) 5-6 ft. of 16-3 SJOOW wire/cord. You can buy this by the foot at Home Depot off the spools. I used 8-12 inches of that for the misc. black and white wiring between the temp control and the outlet inside the project box (in 4-6" segments) and then I used the other 5' for an extension cord from the project box to the wall outlet);
(3) A grip plug (at the other end of the 16-3 wire);
(3) Blue wire nuts (the kind which say "maximum capacity 3 #16 wires");
(4) the Giorgio temp controller;
(5) The sketch which David drew up (find that attached);
(6) 5x7x3 Radio Shack project box.
Beyond a shadow of a doubt, someone will chime in here but I think that's all you'll need (as long as you have all the tools).
Okay, if I have the time I'll write it up.
I understand what Bill is saying and was planning on that all along. My problem is that if I don't understand 110% of what I'm doing, I tend not to do it all. I just like to know what's going on to avoid problems. I researched for about 4 months before I brewed my first batch and had already researched all-grain pretty thoroughly even though I was doing extract.
Jim, even though I love a good man-date, maybe you could just post a list of what you purchased and I can get them on my own. I have the box and controller, a dremel and soldering iron.
Thomas, I don't even understand what Bill just said and I did it correctly.
You want help, let me know.
Bill: thanks for the tip, I would not have use this cord unless some ee said it was perfectly safe. I just purchased the cord and didn't even look at it because I thought no one would sell un-grounded cords. I was wrong.
Jim: I would love to take you up on your offer, what are good days/times for you?
Better to use grounded.
In all honesty, I'd rather show you than tell you how to do it. I was pretty confused and hesitant simply *reading* all the posts/explanations about it. Once I actually did it, I realized it was freakin' easy as hell.
Let's pick a time to go to Home Depot and I'll show you all the right materials (I have some materials left over which you can use, actually).
I picked up a box and have a dremel that will cut nice holes. I have a cord but it isn't grounded... is this going to work?
Get a project box (5 x 7 x 3) from RAdio Shack. Follow David's instructions (somehwere in another thread) for the wiring. The biggest pain in the ass was cutting the rectangular hole in the project box for the temp controller and cutting the somewhat circular openings for the plugs.
Pictures and explanation of how you wired the controller... my stuff is on order and should be here any day.
You all should look at the BYO FaceBook page. They're having a contest to win a triple-tap tower kegerator for uploading your "home bar." Some of the keezers/kegerators people have built are freakin' awesome.
Yeah, maybe not exactly 5 (perhaps 5.# cu. ft.) but it holds two kegs.
WOW Jim, nice job. That looks great! I got to build one of these!
Thanks! I did paint it myself (it was a white freezer): flat black paint for the "trim" and tower; chalkboard paint for the rest.
Very nice Jim! Did you paint the whole thing or was it a black freezer?
Looks awesome Jim!
Its majority done. I just need to add a wooden shroud and stain everything.
Thanks! If you need any help on yours, David, I would surely return the favor.
Good job...I'm still working on mine...just don't seem to have the time these days.
I do. I think for the average Joe the electric part was the trickiest/most worrisome. I've used a drill before (for the bolts, beer line, &c.) but I had never done any electrical work. So, if people want, I can do a workshop on building the box (which is also more portable if people wanted to bring the needed supplies to the brew house and do it along with me; can't really bring the entire freezer/fridge).
I don't mind you asking. I kept pretty careful track and it came in somewhere around $300 for everything (from the freezer and taps to the paint and electrical tape and paint brushes).
But, I will admit that I did not have a lot of tools, &c. lying around at my disposal so the total includes a few $4 drill bits, $8 wire cutters; and niceties like a couple $4 pints of different color paint (for the trim and tower) as well as $7 slider-feet so I can slide it around easily on our wood floor. Yeah, I know there were probably tools and some other things at the brew I could've borrowed but I wanted to have all the requisite tools in my immediate possession in case I need/want to do the project again.
So, for someone who already has tools and paint and other things, it could potentially cost under $250.
Kyle Arnold said:
Like the look of the chalkboard paint. What did the entire project roughly cost you? If you don't mind me asking.
Thanks! It holds two 5 gallon cornies of either type (the shorter, bit rounder converted-pin-lock or the real ball lock). But, there's a bit of room to spare (which I will use to store bottled beer since our fridge is so freakin' tiny). I measured and, at least with my specific chest freezer, I would have needed a pretty tall collar if I wanted to fit two more cornies on the - what-do-you-call-it? - the "hump" (under which is the compressor).
I did indeed use the article from BYO. It was really clear and helpful.
Kyle Arnold said:
That looks amazing man. Nice work. Did you use the tower tap instructional from a BYO article a few issues ago? Also how many cornys will it hold?